本文最后更新于:March 17, 2021 pm
本文主要对openresty做入门简介以及初始化的安装配置介绍。
1、OpenResty简介 了解过web服务器的同学肯定对nginx不陌生,nginx作为目前占有率第一的web服务器,本身作为静态web服务器、反向代理服务和四层、七层负载均衡器都有着非常优秀的表现。但是对于web服务器而言,nginx的很多功能都偏向于静态web应用,也就是说它的动态处理能力是有一定的缺失的。举个最简单的例子,nginx无法在配置中直接进行一个条件以上的逻辑判断,这对于一些架构设计来说有着较大的不便。OpenResty的诞生就是为了解决这个问题。
官方对于OpenResty的介绍是:
OpenResty® 是一个基于 Nginx 与 Lua 的高性能 Web 平台,其内部集成了大量精良的 Lua 库、第三方模块以及大多数的依赖项。用于方便地搭建能够处理超高并发、扩展性极高的动态 Web 应用、Web 服务和动态网关。
OpenResty® 通过汇聚各种设计精良的 Nginx 模块(主要由 OpenResty 团队自主开发),从而将 Nginx 有效地变成一个强大的通用 Web 应用平台。这样,Web 开发人员和系统工程师可以使用 Lua 脚本语言调动 Nginx 支持的各种 C 以及 Lua 模块,快速构造出足以胜任 10K 乃至 1000K 以上单机并发连接的高性能 Web 应用系统。
OpenResty® 的目标是让你的Web服务直接跑在 Nginx 服务内部,充分利用 Nginx 的非阻塞 I/O 模型,不仅仅对 HTTP 客户端请求,甚至于对远程后端诸如 MySQL、PostgreSQL、Memcached 以及 Redis 等都进行一致的高性能响应。
个人简单的理解就是OpenResty=nginx+lua+第三方库,事实上nginx本身也可以通过编译的方式添加lua的支持,同时nginx也可以通过编译的方式添加第三方库的支持,OpenResty则是直接将其全部打包在一起。且不讨论OpenResty作为全能型web服务器是否能够满足所有的业务需求,就其突出的动态处理能力就能给我们的系统架构带来很大的灵活性和额外的多样化处理能力。
2、yum安装 2.1 配置yum源 openresty官网有提供各种主流Linux发行版的预编译包 ,如果没有特殊需求,一般可以直接使用官方提供的安装包进行安装。
下面我们以centos为例进行示范:
// openresty.org/package/ centos/openresty.repo/etc/yum .repos.d/
2.2 rpm包介绍 openresty的yum源中除了openresty本身之外,还有一些其他的工具包和依赖包,我们可以这样查看所有可用的rpm包,对于这些rpm包的详细内容解说可以查看官网的文档 。
sudo yum --disablerepo= "*" --enablerepo= "openresty" list available
下面简单介绍几个重点的rpm包。
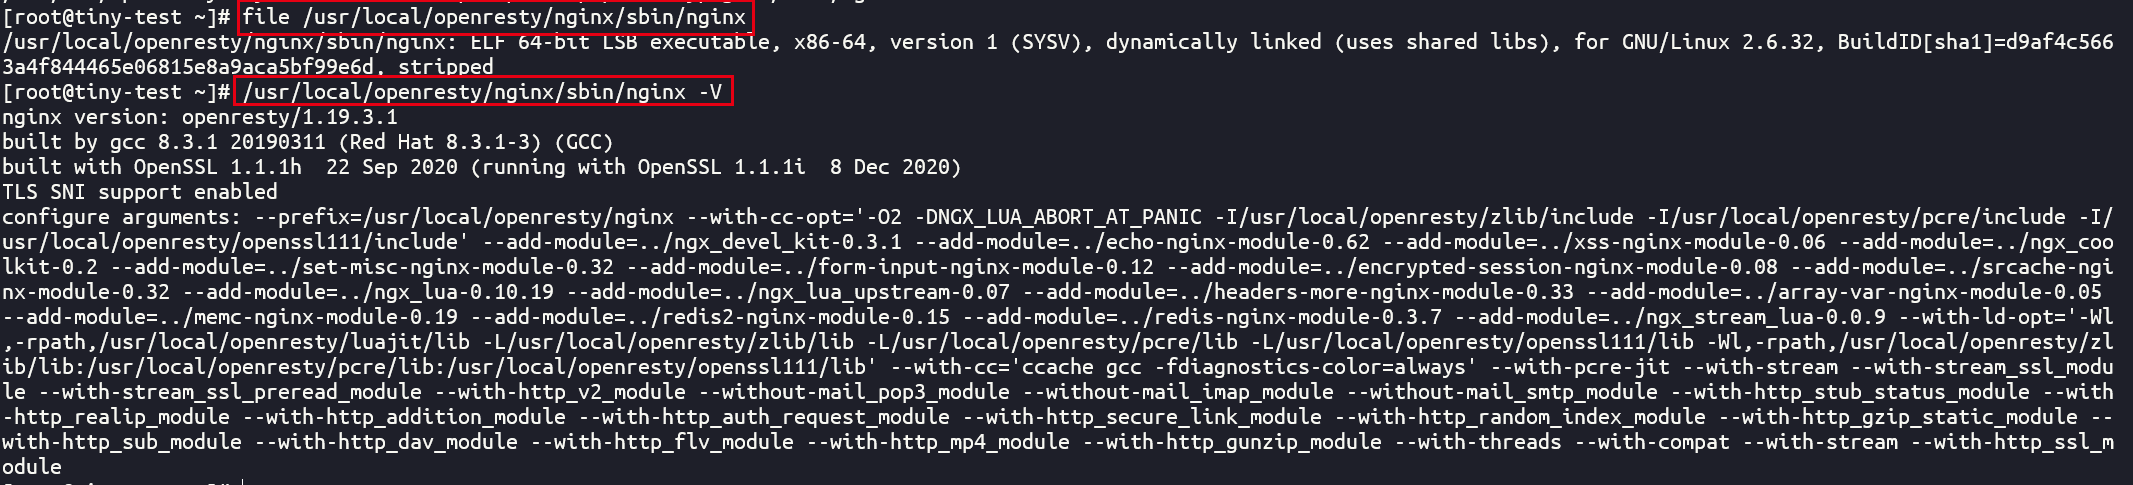
2.2.1 openresty 这是用于核心 OpenResty 服务的生产版本。也就是整个openresty中提供主要服务的核心功能文件。在使用rpm包安装的情况下,系统中的openresty指令会链接到/usr/bin/openresty,而/usr/bin/openresty实际上是/usr/local/openresty/nginx/sbin/nginx的软链接
实际上/usr/local/openresty/nginx/sbin/nginx才是整个openresty的nginx可执行文件的本体,我们加上-V参数即可查看它包括编译模块在内的详细情况。之所以要将其软链接到/usr/bin/openresty,官方解释是为了避免和机器上已有的nginx发生冲突。
从上面的编译参数中我们可以看到openresty使用了它们自己维护的openssl库、zlib库、pcre库和LuaJIT库,这样一来能够较好地控制各个库之间的版本以及功能更新和同步协调。
2.2.2 openresty-resty 这个包里面有 resty 命令行程序,这个工具包主要依赖于 resty-cli 这个项目,这个包依赖标准 的perl 包以及上面提到的 openresty 包才能正常工作。默认情况下它是指向/usr/bin/resty目录的一个环境变量,并且源文件在/usr/local/openresty/bin/resty
个人认为这个工具包的主要作用就是方便我们进行一些简单的命令调试
$ resty -e 'ngx.say("hello")'
2.2.3 openresty-doc 顾名思义这个rpm包最重要的功能就是提供文档查询,一般来说需要注意使用UTF-8编码的Terminal即可。和man命令有些类似,如果我们想要查询openresty中某个模块的相关文档,只需要使用restydoc命令即可。
restydoc ngx_lua
2.2.4 openresty-openssl 这是openresty官方维护的 OpenSSL 库。为了节省开销,这个版本禁用了在构建中对于多线程的支持。此外,这个版本最重要的是OpenResty官方加入了他们自己的一些补丁包来支持一些openssl的最新特性,同时也做了一些优化使得比较旧的系统也能够支持最新版本的openssl。同理,不仅是openssl,openresty自己维护的pcre和zlib库也是有这种的目的。
和nginx默认的rpm版本使用的还是较旧/稳定的openssl版本相比,openresty对于openssl版本的支持无疑是比较激进的。
2.2.5 其他 更多详细的包介绍可以查看官方的英文文档,介绍的比较全面,一般来说就是主要的几个工具软件如openresty、openssl、pcre、zlib等等的主要生产版本、debug版本、asan版本、valgrind版本等,这里不做赘述。
2.3 rpm包安装openresty 虽然上面介绍了很多个openresty相关的包,但是实际上安装的时候只需要安装openresty,其他的依赖关系会由yum自动处理。注意openresty-doc、openresty-resty等是可选安装的包。
check-update
安装完成之后会在默认的目录路径/usr/local/openresty/nginx下面生成对应的配置文件目录,我们将其和yum安装的nginx和编译安装的nginx对比可以发现几乎是一致的。
1 2 3 4 5 6 7 8 9 10 11 12 13 14 15 16 17 pwd ls pwd ls pwd ls
我们简单写一个nginx.conf配置文件用来测试即可,文件使用默认路径的/usr/local/openresty/nginx/conf/nginx.conf。
1 2 3 4 5 6 7 8 9 10 11 12 13 14 15 16 17 18 19 20 21 22 23 24 25 26 27 28 29 30 31 32 33 34 35 $ openresty -Ttest is successful'$remote_addr | [$time_local] | $status | $scheme | ' '$server_name | request= $request | request_uri= $request_uri | http_referer= $http_referer | ' 'UA= $http_user_agent | $request_time | $ssl_protocol | $ssl_cipher | ' 'remote_port= $remote_port | $request_id' ;"<p>hello, world</p>" )
分别使用curl和浏览器测试均正常
$ curl 10.224.192.144:8080<p > hello, world</p >
日志中也能看到对应的操作
$ tail -f ../logs/access.log [12/Mar/2021:14:42:25 +0800] | 200 | http | | request= GET / HTTP/1.1 | request_uri= / | http_referer= - | UA= curl/7.29.0 | 0.000 | - | - | remote_port= 34626 | 602882ad9b5cf910bea2f6d13ce4bf5e 10.228.18.249 | [12/Mar/2021:14:42:51 +0800] | 200 | http | | request= GET / HTTP/1.1 | request_uri= / | http_referer= - | UA= Mozilla/5.0 (Windows NT 10.0; Win64; x64) AppleWebKit/537.36 (KHTML, like Gecko) Chrome/88.0.4324.190 Safari/537.36 | 0.000 | - | - | remote_port= 7148 | 5a91256294bf307ed62f48a06905dbc0 10.228.18.249 | [12/Mar/2021:14:42:51 +0800] | 200 | http | | request= GET /favicon.ico HTTP/1.1 | request_uri= /favicon.ico | http_referer= http://10.224.192.144:8080/ | UA= Mozilla/5.0 (Windows NT 10.0; Win64; x64) AppleWebKit/537.36 (KHTML, like Gecko) Chrome/88.0.4324.190 Safari/537.36 | 0.000 | - | - | remote_port= 7148 | 372e7402db9f396950dae48b66a7e1ce
再查看端口监听和服务进程都正常
那么就可以基本判定这次的安装是顺利安装成功了。
3、源码编译安装 如果需要进行定制化,那么从源码开始进行编译安装就是我们的不二之选。首先我们去官网 下载最新版本的openresty源码包并解压。
cd /home
3.1 编译环境 $ lsb_release -a-4 .1-amd64:core-4 .1-noarch:cxx-4 .1-amd64:cxx-4 .1-noarch:desktop-4 .1-amd64:desktop-4 .1-noarch:languages-4 .1-amd64:languages-4 .1-noarch:printing-4 .1-amd64:printing-4 .1-noarch
同时我们还需要准备编译使用的工具如编译器等,对于CentOS7,我们可以简单的安装整个开发工具包Development Tools。
yum grouplist"Development Tools" -y
3.2 准备openssl、pcre和zlib 和nginx一样,我们手动下载准备最新版本的openssl、pcre和zlib,注意这三个库只需要下载解压,并不需要提前进行安装 。
3.3 编译安装 和nginx的编译安装一样,我们可以自定义编译安装的模块,这里可以查看openresty模块的官方说明 。
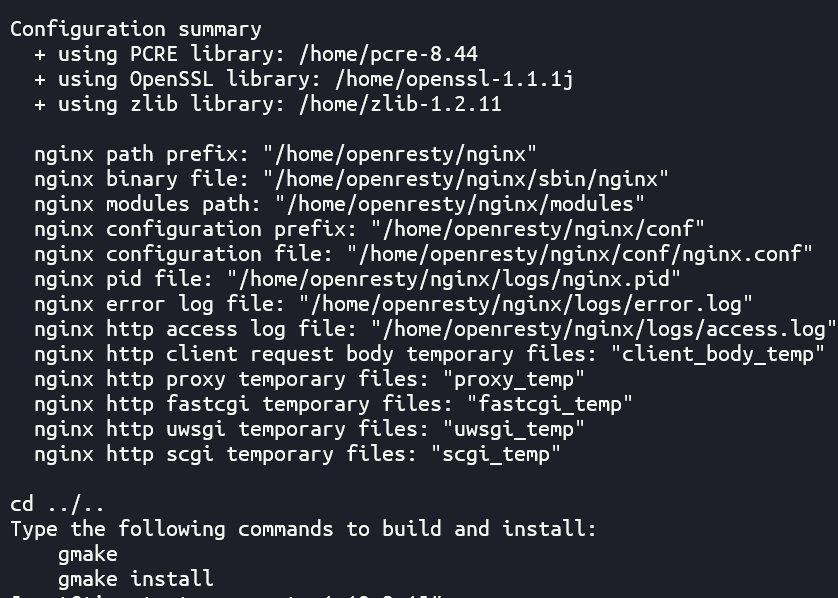
cd /home/openresty-1.19.3.1/ ./configure --prefix=/home/openresty --with-openssl=/home/openssl-1 .1.1j --with-pcre=/home/pcre-8 .44 --with-zlib=/home/zlib-1 .2.11 --with-http_realip_module --with-http_stub_status_module --with-debug --with-http_ssl_module --with-http_v2_module
最后在安装完成的时候我们可以看到会把编译的openresty目录下的/home/openresty/nginx/sbin/nginx软链接到/home/openresty/bin/openresty,逻辑和yum安装的openresty一样
如果想要方便全局操作,可以创建一个软链接。
ln -s /home/ openresty/bin/ openresty /usr/ local/bin/ openresty
当然要是觉得这样子的目录不好操作,我们也可以在编译的时候多加一些参数,将常用的目录都手动指定,操作起来就和nginx几乎没有差别了,下面简单列举一个例子:
1 2 3 4 5 6 7 8 9 10 11 12 13 14 15 16 17 18 19 20 21 22 23 ./configure \ \ \ \ \ \ \ \ /home/openresty/client_body_temp/ \ /home/openresty/proxy_temp/ \ /home/openresty/fastcgi_temp/ \ /home/openresty/uwsgi_temp/ \ /home/openresty/scgi_temp/ \ with -openssl=/home/openssl-1.1 .1k \ with -pcre=/home/pcre-8.44 \ with -zlib=/home/zlib-1.2 .11 \ with -http_realip_module \ with -http_stub_status_module \ with -debug \ with -http_ssl_module \ with -http_v2_module \ \
4、OpenResty操作 openresty的操作指令和nginx是完全一致的 。具体如下:
1 2 3 4 5 6 7 8 9 10 11 12 13 14 15 16 17 18 19 20 21 22 23 24 25 26 27 28 29 30 31 32 33 $ nginx -h1.19 .8 exit exit exit exit /etc/ nginx/)/var/ log/nginx/ error.log)/etc/ nginx/nginx.conf)1.19 .3.1 exit exit exit exit /usr/ local/openresty/ nginx/)
-h 打印帮助菜单-v 小写的v是打印版本并退出-V 大写的V是打印编译参数和版本信息并退出-t 小写的t是测试配置文件是否有错误并退出-T 大写的T是测试配置文件是否有误并且打印出生效的配置文件并退出,如果nginx.conf里面使用了include命令添加了其他的配置文件,也会一并拼接打印出来-q 在测试期间不打印非错误信息,适合debug使用-s 发送信号控制master进程,分别为stop(暴力停止), quit(优雅停止), reopen(重新打开日志文件), reload(优雅重启)-p通过-p参数来指定实际的工作目录,例如我们有两个不同的测试项目,则可以通过openresty -p /path/to/app在启动的时候指定不同的工作目录,从而实现允许多个不同的 OpenResty 应用共享同一个 OpenResty 服务程序的效果-c 通过-c参数来指定不同的配置文件而非只是默认路径下的配置文件-g 在启动的时候设定配置文件之外的全局指令,例如openresty -g "pid /var/run/nginx.pid; worker_processes 8;"